Backup & Restore
Overview
Indexly provides a robust, incremental backup and restore system designed for reliability, transparency, and automation. It supports:
- Full and incremental backups
- Encrypted archives (
.enc) - Strong checksum verification
- Automatic scheduled backups
- Safe restore with chain reconstruction
Backups are optimized for long-term storage and predictable restores.
Backup Types
Full Backup
A full backup captures the entire folder state at a point in time.
indexly backup "E:\data"
- Required as the base for incrementals
- Self-contained
- Recommended periodically
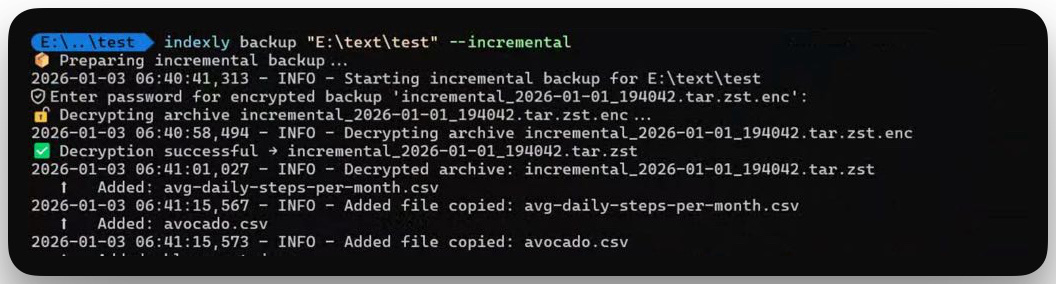
Incremental Backup
Incremental backups store only changes since the last backup.
indexly backup "E:\data" --incremental
- Faster
- Smaller archives
- Requires restore chain
Indexly automatically determines the correct base.
Encryption
Encrypted Backups
Backups can be encrypted using a password:
indexly backup "E:\data" --encrypt mypassword
- Encryption happens after compression
- Resulting file ends with
.enc - Registry tracks encryption state
Example:
full_2026-01-01_191528.tar.zst.enc
The original archive is replaced by its encrypted form (.enc).
Checksums
Indexly generates a SHA-256 checksum for every backup:
full_2026-01-01_191528.tar.zst.sha256
- Always computed on the compressed archive before encryption
- Ensures archive integrity
- Verified automatically during restore
Users may optionally verify checksums manually after decryption.
Compression
Indexly automatically selects the best available compression:
| Method | Extension | Condition |
|---|---|---|
| Zstandard | .tar.zst |
zstd available |
| Gzip | .tar.gz |
fallback |
Detection is runtime-based—no manual selection needed.
Restore Process
Basic Restore
indexly restore full_2026-01-01_191528.tar.zst.enc --target "E:\restore"
Encrypted Restore
- Encryption is auto-detected via
.enc - No extra flags required
- Password prompt allows 3 attempts
🔐 Enter password (attempt 1/3)
If decryption fails after 3 attempts, restore aborts safely.
Incremental Restore Chains
Restoring an incremental backup automatically:
- Locates the base full backup
- Replays all incrementals in order
- Verifies checksums at each step
Incremental restore chains are reconstructed automatically during restore, so users only need to restore the latest archive—Indexly handles the rest.
Automatic Backups
Automatic backups in Indexly are designed to be explicit, transparent, and user-controlled. Instead of silently running in the background, Indexly creates a runnable backup script that you can review, schedule, and manage yourself.
This approach gives you:
- Full visibility into what runs
- OS-native scheduling (no hidden daemons)
- Enterprise-grade structured logs
- Easy enable/disable behavior
Step 1: Initialize Automatic Backup
To enable automatic backups for a folder, run:
indexly backup "E:\data" --init-auto
What happens next, step by step:
- Indexly creates the backup directory structure in:
~/Documents/indexly-backups/
- An auto-backup marker (
auto_enabled.json) is written. - A platform-specific backup script is generated:
- Windows →
indexly_backup.bat - macOS / Linux →
indexly_backup.sh
- Windows →
- The script is pre-filled with:
- Your backup source path
- Log directory
- Safe defaults for Python and Indexly execution
You’ll see confirmation in the terminal along with the script location.
Step 2: Understand the Generated Script
Indexly intentionally generates a plain, readable script so you always know what runs.
Example: Windows indexly_backup.bat
+--------------------------------------------------+
| indexly_backup.bat                               |
+--------------------------------------------------+
| @echo off                                        |
|                                                  |
| set INDEXLY_EXE=indexly                          |
| set BACKUP_SOURCE=E:\data                        |
| set LOG_DIR=C:\Users\User\Documents\             |
|   indexly-backups\logs                           |
|                                                  |
| set TIMESTAMP=2026-01-04_020000                  |
| set LOG_FILE=%LOG_DIR%\backup_%TIMESTAMP%.log    |
|                                                  |
| "%INDEXLY_EXE%" backup "%BACKUP_SOURCE%"         |
|   >> "%LOG_FILE%" 2>&1                           |
+--------------------------------------------------+
Key points:
- No hardcoded project paths
- Works for both developers and non-developers
- Uses virtual environment Python if available
- Falls back to system Python and PATH-installed
indexly
You are encouraged to open and inspect this file.
Step 3: Schedule the Script (User-Controlled)
Indexly does not auto-schedule tasks for you. This is intentional — you stay in control.
Windows (Task Scheduler)
- Schedule
indexly_backup.bat - Run daily, weekly, or on login
- Use highest privileges if backing up protected folders
macOS / Linux (cron)
0 2 * * * /path/to/indexly_backup.sh
Runs daily at 02:00.
For detailed scheduler instructions, see:
- Microsoft Task Scheduler docs: https://learn.microsoft.com/windows/win32/taskschd/task-scheduler-start-page
- Cron reference: https://man7.org/linux/man-pages/man5/crontab.5.html
Logging & Observability (New)
Automatic backups use enterprise-grade structured JSON logs.
Where Logs Are Stored
All auto-backup logs are written to:
~/Documents/indexly-backups/logs/
Each run produces a timestamped .log file.
Log Format
- One JSON object per line
- UTC timestamps
- Event-driven structure
- Safe for automation and auditing
Example entry:
{
  "schema": "indexly.log",
  "version": 1,
  "ts": "2026-01-04T01:59:12.341Z",
  "level": "INFO",
  "component": "auto-backup",
  "event": "backup.complete",
  "message": "Incremental backup completed successfully",
  "context": {
    "source": "E:\\data"
  }
}
Viewing Logs in the Terminal
macOS / Linux
cat backup_2026-01-04_020000.log | jq
Windows (PowerShell)
type backup_2026-01-04_020000.log | jq
To install jq on Windows:
choco install jq
If Chocolatey is not installed, see: https://learn.microsoft.com/windows/terminal/ or my guide on 🔧 Customizing Windows Terminal – Setup and optimization
Disabling Automatic Backups
To safely disable auto-backups:
indexly backup "E:\data" --disable-auto --confirm
This will:
- Remove the auto-backup marker
- Delete the generated
.bat/.shscript - Prevent any further scheduled runs
Nothing is left behind unintentionally.
Summary
Automatic backups in Indexly are:
- ✅ Explicit, not hidden
- ✅ Script-based and auditable
- ✅ OS-native and portable
- ✅ Logged in structured JSON
- ✅ Easy to enable and fully reversible
You stay in control — Indexly just makes it reliable.